Choosing the right mountaineering boots to conquer the summits safely
Find out how to choose your mountaineering boots: comfort, fit, crampons... the exact criteria for avoiding mistakes.
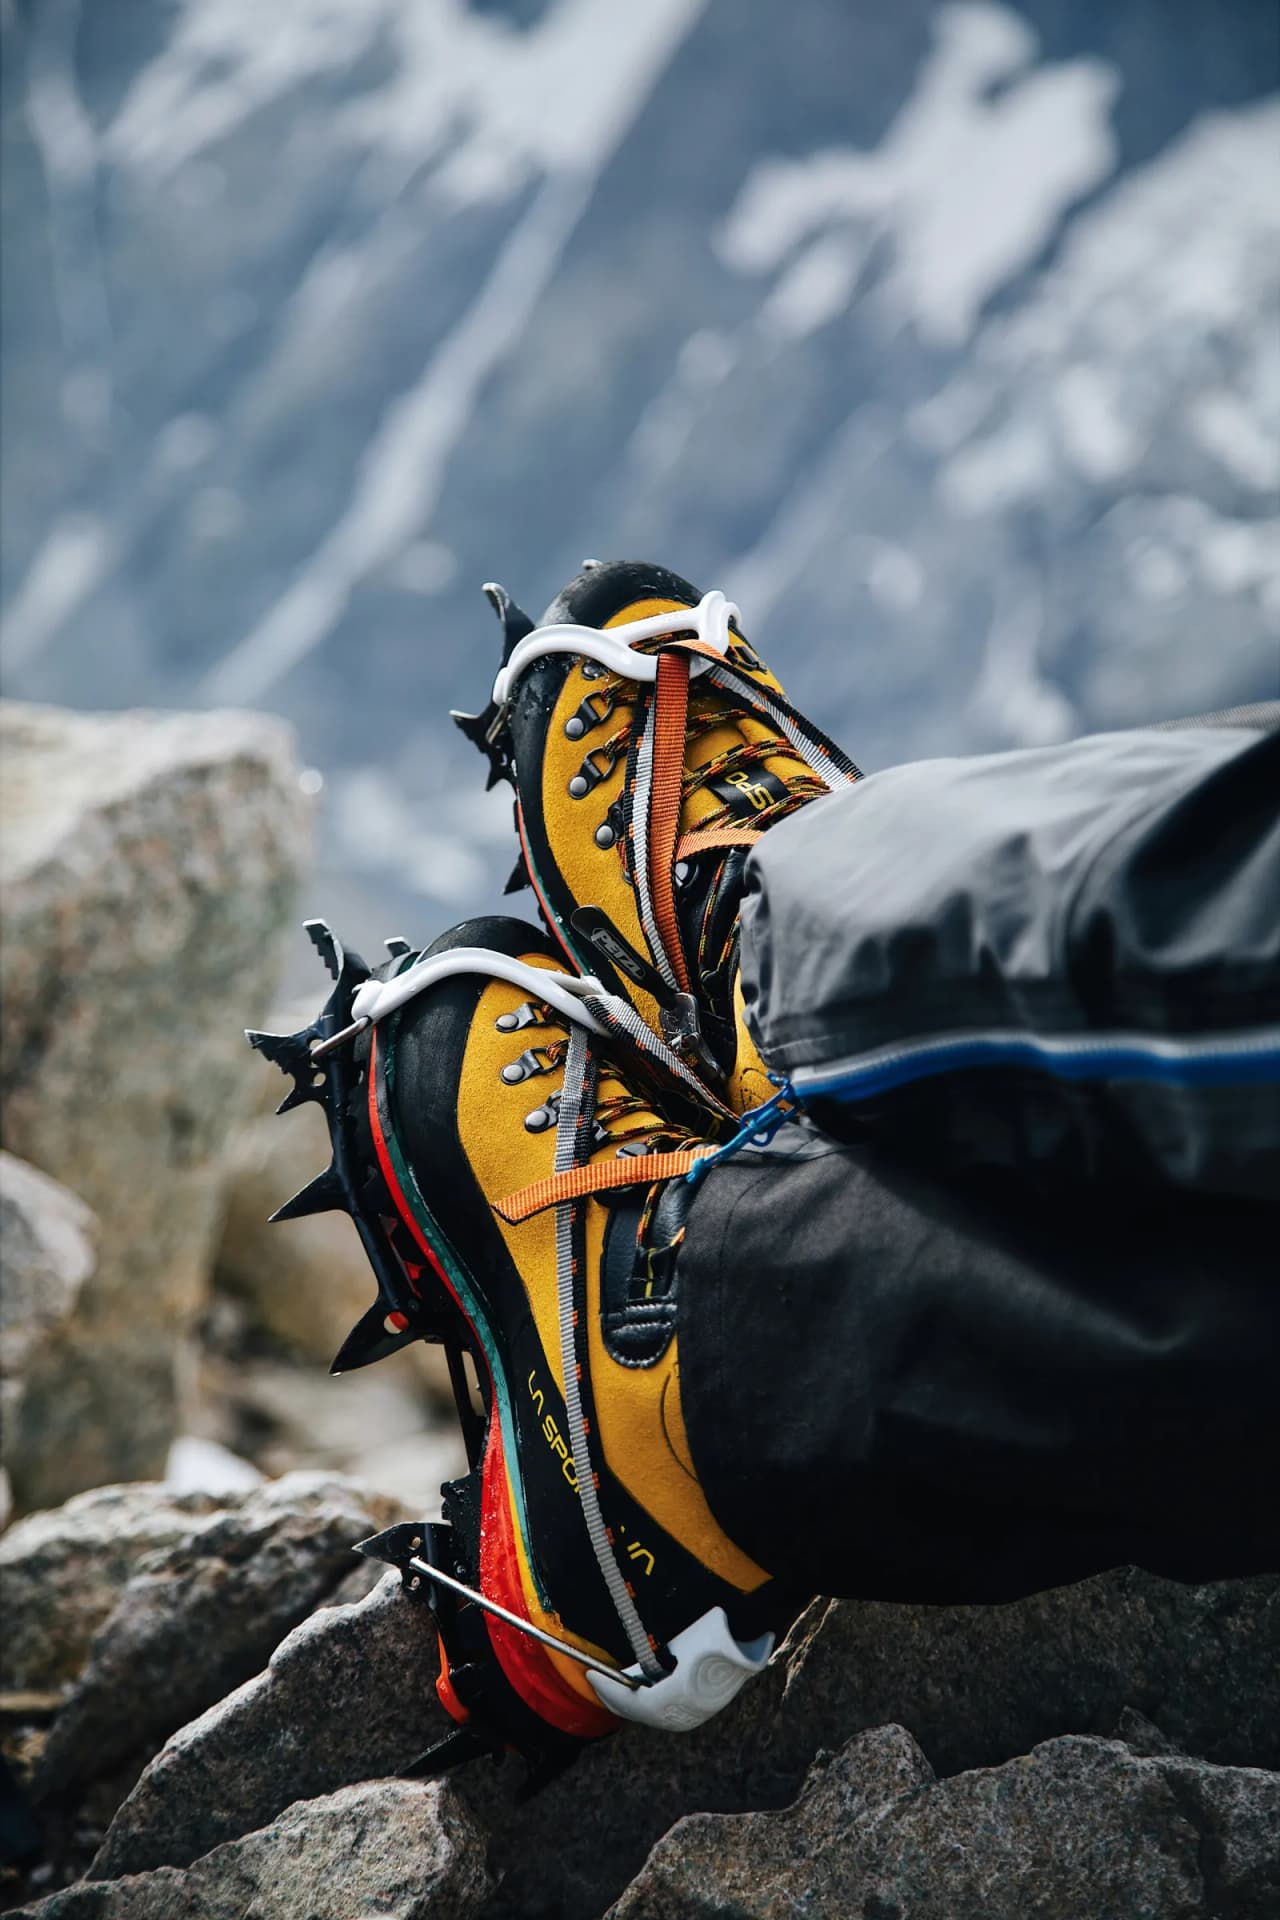
Mountaineering boots protect your feet where conventional hiking boots quickly reach their limits, on hard snow, ice, rock, cold and exposed terrain.
They do four key things:
- warmth to limit numbness
- precision, so you can place your foot on small holds
- rigidity for walking and cramponing without bending
- safety, thanks to ankle support and impact protection.
In practice, a well-chosen boot reduces fatigue and placement errors, especially in long or technical progression. This is also a point that guides often check before an outing, for example on a glacier trek or an introductory weekend.
Common mistakes to avoid from the outset
Take boots that are too soft: you lose stability and compatibility with crampons.
Take boots that are too warm or too rigid for your use: you'll sweat, you'll suffer and you'll walk badly.
Neglect the fitting with your socks and a suitable sole.
Confusing a waterproof membrane with internal moisture management.
- Understanding the different parts of a boot
A mountaineering boot is best chosen when you know what each part does in the field. Warmth, crampon precision and safety on slopes come from a whole, not just one criterion.
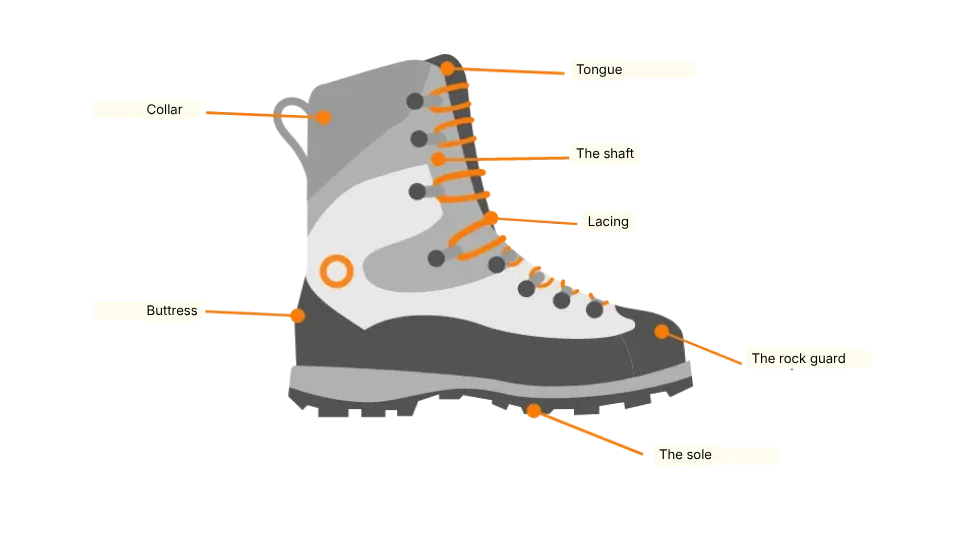
The shaft, support and protection
The upper controls ankle support and support on steep terrain. A higher shaft limits torsion and provides better protection from the snow, but it may require more practice. Also look at the material - leather, synthetic or a combination - as this influences durability, maintenance and moisture resistance.
The sole, rigidity and precision
The sole determines rigidity, and therefore efficiency on ice and fatigue over long approaches. A rigid sole makes it easier to grip crampons and small holds, but is less forgiving on trails. The outsole (often rubber) improves grip on wet rock.
The rock guard and reinforcements, resistance
The rock guard (rand) protects the front and sides of the boot from crampons, rocks and frost. A good stone guard also limits water ingress through abrasion. On mixed races, this is a key point, as impacts are frequent.
Insulation: keeping the heat in
Insulation depends on the internal layers and the volume. More insulation improves comfort at relays and in cold conditions, but can increase perspiration during exercise. Look for a balance depending on how cold you are, your pace and the duration of your run.
Membrane, moisture management
A waterproof, breathable membrane (e.g. Gore Tex, brand name of W. L. Gore) limits water ingress, but breathability varies with use and wear. An integrated gaiter adds a real barrier against wet snow.
Lacing, fine-tuning and safety
Precise lacing secures the heel and prevents blisters. Locking hooks allow you to adjust the bottom of the foot and the shaft in different ways. On guided outings, such as Wildhartt expeditions, good lacing simplifies quick adjustments when the weather turns.
For what type of activity (glacier hiking, mixed races, winter)?
Choose your mountaineering boots according to three criteria: the terrain (snow, ice, rock), the duration (half a day or several days) and your sensitivity to the cold. A simple rule of thumb: the steeper and more insulated the boot, the safer it is on hard snow, but the heavier the boot, the less pleasant it is on the trail.
Glacier hiking and summer mountaineering
For a classic glacier run (walking, snow slopes, easy passages), aim for a fairly rigid boot that retains precision. You need to be able to walk for a long time without pain, while still having enough grip to hold on to crampons. If you're preparing for your first 4000 m ascent, an outing such as the Grand Paradis in mountaineering is a good example of this requirement.
Stiffness: medium to high, to limit flex on hard snow.
Warmth: moderate insulation, suitable for an early morning start and altitude.
Profile: versatile enough to approach on trails and then switch to glaciers.
Mixed terrain (rock, snow, ice)
In mixed terrain, the boot must remain precise on rock and stable in crampons. A sole that is too soft creates instability, and a boot that is too bulky hinders support.
Stiffness: high, to hold the front toes on short, steep sections.
Support: effective tightening at the instep, well locked heel.
Protection: rock protector and hard-wearing upper for frequent impacts.
Winter mountaineering and severe cold
In winter, the priority becomes warmth and moisture management. The cold reduces sensitivity, and you can't place your feet as well as you should, so the boot needs to compensate with good rigidity and support.
Insulation: strong, often with integrated gaiter or construction designed for winter.
Use: the longer the outing, the higher the level of warmth.
If you're deciding between two categories, base your choice on your most demanding activity and your level. On a Wildhartt guided outing, a guide can also check that your choice corresponds to the actual terrain and the stated duration.
Check compatibility with crampons
Crampon compatibility is based on a simple point: the rigidity of the sole and the presence of front and heel protrusions. If you get it wrong, the crampon will move, unhook or adjust incorrectly, especially on hard snow.
Choosing the right binding system
Each type of crampon corresponds to a boot and a level of rigidity.
Semi-automatic crampons: strap at the front, stirrup at the heel, require a clear rear overhang, more stable on steeper terrain.
Automatic crampons: front and rear stirrups, require front and rear overhangs, suitable for steep and technical terrain.
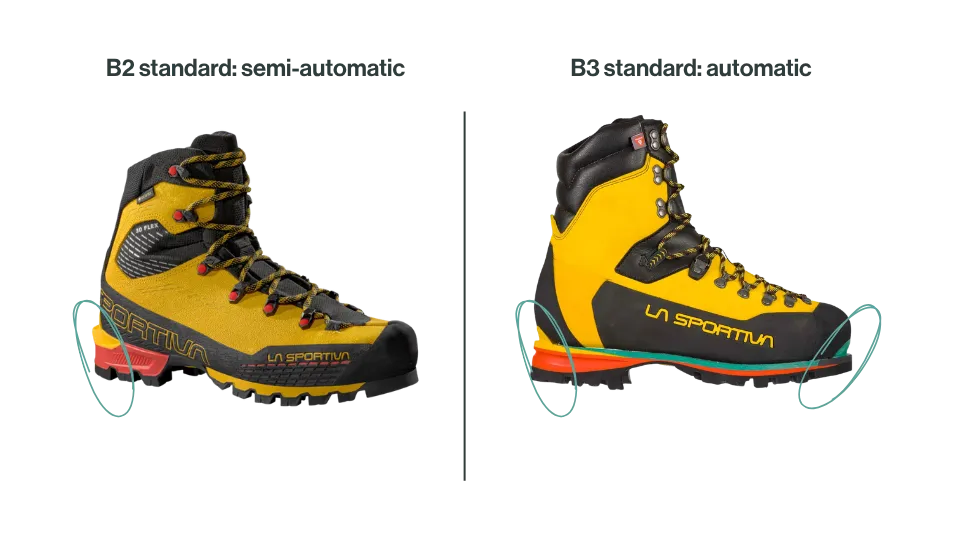
Understanding B2, B3 and overhangs
The B standard indicates the shoe's ability to carry a crampon, mainly through its rigidity and overhangs.
B2: rigid sole, rear overhang present on most models, aimed at semi-automatic use.
B3: very rigid sole, marked front and rear overhangs, aimed at automatic (and semi-automatic).
A simple method for checking in shop or before going out
Locate the overhangs, rigid lip at the heel, sometimes at the front, they must be straight and not rounded.
Fit the cleat, centre it and tighten it fully.
Shake the shoe and try to twist the cleat by hand; you should not feel any play.
Walk around for a few minutes, checking that there are no hard spots on the instep and that the heel is stable.
If you are on a guided outing with Wildhartt, your guides can validate this set-up at the start, especially if you hire or borrow crampons.
Take the weather into account (cold, humidity, altitude)
The weather often determines the right model, even for the same race. Adapt your insulation, membrane and gaiter according to three simple factors: the temperature you feel, the humidity in all its forms, and the wind. If you're in any doubt after reading the 'type of use' section, use this weather filter to help you decide.
Cold: choosing insulation to suit your pace
Cold is most useful when you're stationary and early in the morning. Boots that are too warm make you sweat, then cool you down as soon as you slow down. As a rule of thumb, go up a level if you score at least two points.
Start before dawn and long, slow phases (roping up, manoeuvres).
High altitude or winter day, even with sunshine.
Your feet are often cold, especially at belays or summits.
Humidity: distinguish between external water and internal humidity
External water comes from wet snow, rain, snowdrift crossings or a 'rotten' glacier. In these cases, a waterproof membrane helps, but it doesn't eliminate perspiration moisture. You manage this internal moisture with appropriate socks, lacing to prevent overheating, and short breaks to avoid cooling wet feet.
Heavy spring snow: opt for a stone shield + membrane, and dry carefully in the evening.
Dry, cold conditions: the membrane is still useful, but insulation comes first.
Wind and exposure: protect the top of the boot
Wind increases heat loss, especially on ridges. An integrated gaiter or an external gaiter limits snow ingress and protects the lacing. On a guided Wildhartt outing, a guide can also help you anticipate exposure (ridges, windy areas) and decide whether a gaiter is necessary.
Quick reference to the weather: which pack to aim for
Dry cold: stronger insulation, useful gaiter, secondary membrane.
Cold wet: balanced insulation, important membrane, gaiter recommended.
Mild wet: moderate insulation, useful membrane, priority to sweat management.
Choosing comfort, support and the right size
A boot may be compatible with crampons, but it will still be a poor choice if it creates pressure points. Aim for a simple feel, with the foot locked in place without pain, even when flexing and descending.
Fitting checklist, what you should feel
Volume: the front of the foot should not be compressed, especially on the sides. If you feel pressure when you're resting, it quickly increases when you're cold.
Heel: it should remain stable. There may be a slight movement at the very beginning, but it should not rub or lift off when walking.
Forefoot: You need to move your toes. On a slope, they should not tap at the end.
Instep: the lacing should be tight without creating a hard spot. Try different settings: tight at the bottom, looser at the top and vice versa.
Socks: try using your mountaineering socks, not thin city socks. Avoid piling on two pairs to 'gain' warmth, as you often lose precision.
Terrain test: walk for 10 minutes, then do some uphill and downhill runs. Look for clear support, with no internal slippage.
Thermoforming and insoles, when it really helps
Thermoforming is used mainly on certain technical shoes and boots. It improves contact and reduces wobbling, but it does not correct a shoe size that is too small. An insole (e.g. Sidas, a brand of insoles) can also stabilise the heel and support the arch.
Simple rule for choosing a shoe size
Choose a size that leaves around 8 to 12 mm in front of the biggest toe, with the heel at the bottom and the foot loaded. When going downhill, your toes should not touch. If you hesitate between two sizes, choose the one that keeps the heel more stable, then adjust the volume with a more precise sole or lacing.
Before a guided outing with Wildhartt, try them out at home with your bag loaded. You'll soon spot any chafing before it becomes blisters.
Conclusion: the final checklist before buying
Before you buy, check one simple point: the right boot is one that stays securely on the crampon, is warm just right and is wearable for a long time. If just one of these elements is stuck in the shop, it will be even more stuck in the race.
1) Your real use, not your dream run
Main terrain: glacier, mixed, cold winter, and typical length of outing.
Level and pace: the slower you are at a standstill, the more warmth you need.
Priority: versatility (approach + snow) or technicality (steep slopes, front points).
2) Crampon compatibility validated in conditions
Identify B1, B2, B3, and check the front and rear overhangs according to your crampons.
Fit your crampons, tighten, then test: no play, no hard spots on the instep.
If you hire equipment, ask for a full check before you leave (Wildhartt guides often do this).
3) Weather, altitude, humidity
Dry cold: aim for more insulation, gaiter useful.
Wet weather: membrane and gaiter help, dry carefully in the evening.
Mild spring: avoid overheating, focus on managing perspiration.
4) Fit and size, the litmus test
Try on your running socks, heel locked, forefoot free.
Test on a slope or on a wedge: toes touching, size too short.
10-minute walk test: discomfort in the shop becomes pain outside.
If you are still hesitating between two models, choose the one that offers the best heel support and the most stable crampon compatibility. These are the criteria that will avoid the most problems on the ground. For more ideas for outings and preparations, you can also visit the Wildhartt blog.

Find your next adventure
Browse curated expeditions matching the categories of this article and start planning your next trip.
Find your dream adventure
You might also like these adventures …
Hand-picked to echo the spirit of this article.


More to discover
Keep exploring with these pages and stories picked for you.

Snowshoe outings: the ultimate checklist for a successful adventure
Prepare your snowshoe outing stress-free: discover the ultimate checklist for perfect equipment, guaranteed safety and a memorable mountain adventure.

The Ultimate Guide to Snowshoeing: Advice, Equipment and Destinations
Set off on a snowshoeing adventure with our advice, top spots and tips for unforgettable winter walks!

Mountain trail training course in France: which one to choose?
Discover the ideal mountain trail course: compare destinations, levels and objectives to quickly book the right course in France.

Snowshoeing: the ultimate guide to the best routes by region
Discover the most beautiful snowshoe walks by region. Get ready for your adventure with our exclusive advice and experience winter in a whole new way!

Preparing your mountaineering pack
How do you pack for your mountaineering expedition? Here's our guide to packing a light and complete rucksack.

Beginner's mountaineering: The essentials
Getting started in mountaineering sounds exciting, but it's essential to prepare properly to ensure a safe and enjoyable experience.